https://greenthumbtech.com/blogs/news.atomGreen Thumb Technology - News2023-08-08T20:21:56-07:00Green Thumb Technology https://greenthumbtech.com/blogs/news/fresh-greens-and-roasted-veg-with-glory-dressing2023-08-08T20:21:56-07:002023-08-08T20:21:56-07:00Fresh Greens and Roasted Veg with Glory DressingJen McGuinness
If you have lots of greens and want to try something different from salads, try out this super tasty and filling recipe. It is one of our household's favourites!
Ingredients
1 large yam (skins on cut, 1cm x 1 cm cubes)
2 medium beets (skins on, cut 0.5cm x 0.5cm cubes)
3 medium carrots (with peel, slice in 1cm thick)
1/2 tsp of pepper
1/2 tsp of salt
2 tbsp of extra virgin olive oil
4 - 6 cups of greens from your verdeGarden (i.e. lettuce, mustards, kale)
walnut pieces
Dressing
In a food proceesor blend:
1/2 cup of nutritional yeast flakes
1/3 cup of water
1/3 cup of tamari or soy sauce
1/3 cup of apple cider vinegar
2 cloves of garlic, crushed
1 2/2 cup of vegetable or olive oil
2 tbsp of tahini butter
Instructions
Preheat oven to 375 degrees Fahrenheit.
Chop vegetables and mix in bowl with olive oil, salt and pepper, spread out on baking sheet.
Bake for 20 minutes, then flip and bake for another 15 minutes. Set aside an let cool.
Place greens on bottom place and serve cooled roasted veggies on top.
Add walnut pieces and drizzle with glory dressing and serve.
]]>
https://greenthumbtech.com/blogs/news/transplanting-to-your-outdoor-garden2023-05-01T17:30:10-07:002023-05-01T17:30:10-07:00Jump-Start Spring: Transplanting from Indoors to OutdoorsJen McGuinness
Get a jump-start on spring by starting seeds in your verdeGarden, and then transplanting them either into pots, or into your outdoor garden once outside temperatures are warm enough.
This should only be done with seedlings and young plants at the beginning of the vegetative growth stage. Older plants and plants showing buds should be left in the verdeGarden, so as to not disrupt their growing or fruiting cycle.
To do so, transfer the coco coir and plant into a clean pot with potting soil, then water. Keep the transplant slighly moist to help the roots take to their new environment.
What You'll Need
Good quality potting soil
Small trowel
Small to medium clean pot(s)
Additional coco coir seed pucks (optional)
Transplanting Seedlings
If you want to transplant all the seedlings in a single coco coir puck then you will need to remove all but one seedling, leave the largest one in the coco coir. This is because the plants will need space for their roots to grow and seek out nutrients in soil; whereas, the indoor garden transports nutrients to the roots so they need less room. Loosen the coir by gently rolling the puck between your fingers and thumb, gently pluck out the seedlings, being careful not to damage the roots. If you do not intend to keep the removed seedlings, then you may simply trim them off at the base with clean shears.
The coco coir is great for retaining water and nutrients, which means less frequent watering and healthy plants. You can expand additional coco coir seed pucks for the removed seedlings and place one in each puck, or transfer directly into soil. Bury at a similar depth as they were before.
Each seedling can then be transplanted into its own small pot with potting soil. If you want the plant to grow larger before transplant, then remove the unwanted seedlings, leaving the largest, most viable plant in the coco coir.
Pictured below, several Swiss Chard seedlings with cotyledons. Options for transplant:
a) Remove all but largest seedling and allow it to grow (another 2-3 weeks) before planting in a pot with potting soil, or
b) Loosen the coco coir and carefully remove all but the largest seedling from the coco coir, be careful to not damage the roots. Expand additional coco coir pucks (optional) in warm water, one for each seedling, and then plant each in its own pot with potting soil. Or direct sow seedlings into potting soil without the coir puck.
c) Some seedlings may not need thinning. Follow outdoor garden seed reccomendations for plant spacing.
Hardening Off
Leave the transplants indoors for a week while the plants adapt to the soil. Place in a window with some sunlight, but not direct or too intense, while the plant adapts to its new soild environment. Keep soil moist, but do not oversaturate it.
After a week, if the plants are looking healthy you can start to harden them off by moving the pots outside during the day, and bring indoors in the evening. Some sunlight is reccomended, but not too intense as again the plants are adpating to their new outdoor environment. Bring plants indoors, especially if night time temperatures are cool/quite different from day-time temperatures.
Greens such as kale, lettuce and swiss chard can tolerate colder and wetter temperatures, while tomatoes, peppers and most herbs will require hotter and drier temperatures for hardening off, and be more sensetive to cool overnights.
From Pot to Outdoor Garden
If the plant is healthy and showing no signs of shock after hardening off, and you have progressed to it leaving outside for several nights, you can now transfer it into your outdoor veggie garden, or transplant into a larger pot.
]]>
https://greenthumbtech.com/blogs/news/how-to-keep-your-basil-plants-producing-maximum-return2023-04-21T18:55:16-07:002023-04-23T10:32:55-07:00How to keep basil producing for maximum returnJen McGuinness
One of the great things about basil is that it is a perenial, so while other plants will be done after harvest, basil can keep producing for years! Basil has many vitamins, minerals and antioxidantts including lutein, zeaxanthin, beta-carotene, and beta-cryptoxanthin. One could say a spoonful of fresh basil a day will keep the doctor away. Basil's health benefits come from these antioxidants and its esssential oils, both of which can be greatly reduced with drying, so opt for fresh basil whenever possible. .
To get the most out of your basil here are some growing tips:
1. Grow 2-3 plants per pot
After your basil seeds have germinated select the largest seedlings by supporting them while carefully plucking out the small, less vigorous plants. It is important to do this soon after the seeds have sprouted, before the plants develop roots, so as to not damage the roots of the more viable plants. If you missed the opportunity to pluck the small plants, use clean sharp shears to trim their stem(s) off at the base. The verdeGarden delivers nutrients to your plants' roots, allowing you to have more plants in a smaller space than in a soil garden, allowing for 2-3 basil plants per pot.
Removing the less vigorous seedlings from the coco coir puck.
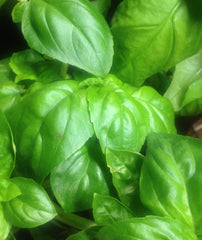
2. Keep basil pruned
Basil likes to be pruned and will put on more vigourous growth with occassional trimming. Do not let your basil grow too tall, 6 inches (12cm) in height will suffice and encourages the plant to fill out and create denser growth. Frequent harvesting every 2-3 weeks also prevents flowering, which stops growth. Denser growth will allow for larger harvests, perfect for making pesto, or freezing or drying for storage. Use clean, sharp shears to trim just above a large leaf cluster approximately 6 inches up from the base. If your basil plant has flowered, snip the flowers off to prevent the leaves from turning bitter and harvest soon, or enjoy the flowers and start over with a new plant afterwards.
Red circles indicating where the top leaves were pruned to keep the plants at 6 inches (12 cm) in height.
Harvest the pruned leaves. Smaller amounts can be used in salads, sandwiches, and fresh on pasta or pizza.
Freshly pruned basil leaves from above with a fresh harvest of lettuce and swiss chard from the verdeGraze garden.
3. Harvest and Repeat
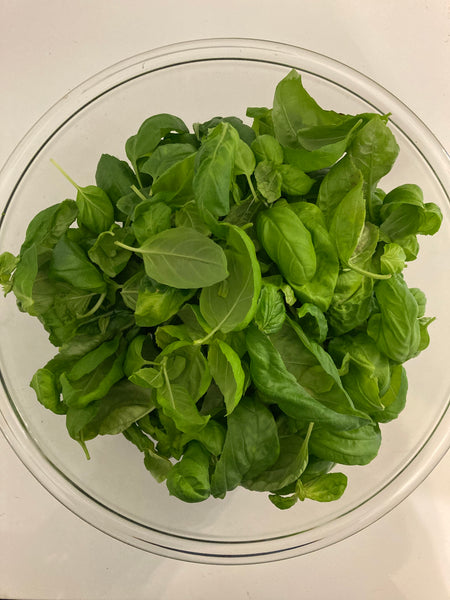
Before harvesting your plants, especially for larger quantities, run a fresh water cycle in your reservoir (no nutrients for 3-7 days). This allows the plant to use up stored minerals and improves flavour and sweetness. Some good options for larger quanitities of basil include freezing or dehydrating to store it, making pesto, or try this hummus basil recipe. Keep in mind fresh pesto will have more health benefits than dried. If you are short on time, you can chop the basil leaves into smaller pieces and add to an ice cube tray with water, freeze and use in dishes as needed.
Large harvest from verdeGarze indoor garden
4. Try different varieties
Did you know there are over 60 varieties of basil. We use organic and heirloom seeds that we know work well in the verdeGarden; however, you can also choose to use your own seeds. Check out our seed collections here. Our favourites are:
Organic Genovese Basil - great for pesto, soups, and fresh on salads, pizza and pasta.
Heirloom Red Rubbing Basil - also sweat and provides amazing colour and antioxidants.
Organic Thai Basil - with its tasty licourice flavour, a must for Thai cooking!
]]>
https://greenthumbtech.com/blogs/news/to-feed-or-not-to-feed-nutrient-feeding-tips2023-02-23T13:36:24-08:002023-03-23T20:50:12-07:00To Feed or Not to Feed. Nutrient Feeding TipsJen McGuinness
In this blog we will cover when to start the nutrient feed schedule for your verdeGarden, and some key tips for success.
Seedlings have their own nutrient reserves
When should you start adding nutrients to your verdeGarden reservoir? Seeds have their own nutritional reserve, so they require no additional nutrients for the first few weeks. The initial leaves on a seedling are part of the seed, called a cotyledon. Cotyledons supply nutrition to the seed to germinate and establishes the plants ability to photosynthesize.
Cotyledons from left to right: Kale, Swiss Chard, Cherry Tomato, and Lettuce
Germination to Cotyledon Phase
To germinate seeds the coco coir pucks need to be moist. Fill your reservoir with 4 litres of fresh water. The indoor temperature in your house should be between 18-23 degrees Celsius (65-71 F) for optimal conditions, and a bit cooler at night. The depth of seed is important to provide the right amount of light or darkness, so follow the seed package instructions carefully. Do not add any nutrients at this time. Ensure your pump is running often enough to keep your coco coir pucks moist for the seeds to germinate.
True Leaves, Time to Feed. Or is it?
Having four true leaves on all your plants is the minimal requirement of when to start the nutrient feed schedule. Because seeds do not germinate at the same rate, some plants may be ready, while others are not. Waiting an extra week, or two, for the slow pokes to catch up is actually a good thing for the fast sprouters. Holding off on feeding forces plants to send out roots to look for nutrients, so when the nutrients does come, they will grow that much quicker because they can uptake more effectively.
The red dots on the Genovese Basil plant above indicate the cotyledons, and the blue dots are the plants first four true leaves. At this stage, the plant is ready for nutrients. The small cotyledon circled in red should be thinned out, by carefully pulling it out, while allowing the two robust basil plants to remain.
The "Weekly" Feed Schedule
The nutrient feed schedule provides a "weekly" guideline; however, nutrients should not be added until the reservoir is at least 3/4 empty. This will ensure the nutrients from the previous week has been absorbed by the plants before more nutrients is added. If your verdeGarden is full of seedlings it will likely take longer before your reservoir needs to be refilled, somewhere in range 9 - 14 day range, depending on indoor temperature, humidity, type and size of plants. As the plants mature, they will require more water and feed more often, so now you will be topping up your reservoir and adding nutrients about every 7 days.
Watch for Nutrient Burn
A common problem inexperienced indoor growers have is the leaves on their plants browning, curling and drying up around the edges. It is important to catch nutrient burn and stop further damage because plants do not have a mechanism to stop overfeeding. Trying to force growth by over-fertilizing can cause irreparable damage. Nutrient burn on lettuce and basil. It is not too late to save these plants by reducing nutrients.
To avoid nutrient burn, ensure the reservoir is at least 3/4 empty before moving on to the next "weekly" feed schedule. You can check the level of water in the reservoir by looking in the poor spout. The pump will also get louder when there is less water, which is a good indication it is time to refill.
Can I plant new seeds and keep my mature plants?
Yes. When you have a variety of plants at different stages, follow the nutrient requirements for the youngest plants. The more mature plants should be flushed with fresh water from time to time to ensure there is not an excess build up of pH. To improve the growth of the new plants, harvest the mature plants down in size so the seedlings have more access to light and room to grow. You can also move plants around in your verdeGarden. To do so, you may need to gently pull the roots out of the reservoir or off the back of the garden. If the roots are really long you can trim the bottom 1/3 off and compost.
Left: New seedlings with mature plants, Right: 5 Weeks Later
More Growing Tips
For more tips on growing check out the Support Tab on our home page and subscribe to our step-by-step weekly youtube videos
]]>
https://greenthumbtech.com/blogs/news/how-verdegardens-work-and-how-to-save-money-growing-your-own-food2022-06-11T21:31:05-07:002022-06-11T21:31:05-07:00How Indoor Gardening Can Save You MoneyJen McGuinness
I was hooked on fresh fruits and veggies from our garden from an early age. Once you have tasted the superior flavour of freshly grown, organic food, it's really hard to go back to grocery store food that has been shipped from thousands of kilometers away and lacks the crispness and fresh nutrient rich vitamins our bodies need.
We sometimes were short on food growing up, so growing a garden was a necessity. For better flavour and nutrients a gardener may spend several hundred dollars on compost, soil, and fertilizers each season. Back then we just removed the grass and sewed seeds because that's all we had and it was still far better then anything that could be bought!
Post Fall Harvest Depression
Fall is a wonderful time for harvesting so much of your summer crop and the effort pays off, but there is nothing worse, for me, then having to go back to the grocery store to buy rotting, overripe, or under ripe, fruits and vegetables from far off places. Not only do they lack the flavour of my garden fresh produce, we are always left wondering about pesticides and safety, such as the numerous e.Coli outbreaks and recalls.
How a VerdeGarden Works
Once you have followed the easy to follow wall mounting template, or placed your VerdeGarden on its stand, there's not much more to do.
1. Self-watering recirculating system
The self-watering garden sends nutrient water from the reservoir to your plant's roots and cascades back to the reservoir creating a recirculating system. Once you have added 4 liters of water to your reservoir you can plug your VerdeGarden in and set the water settings with your phone.
2. LED Grow Light
Once you have plugged in your VerdeGarden you will also set the LED grow light schedule from your phone. The energy efficient grow system uses $0.03 per day for the Nibble and $0.06 per day for the larger Graze.
Reusable net pots
Reusable net pots hold your plants and allow the nutrient water to flow through the roots. Wash in hot water and reuse for your next harvest.
3. Place your seeds in the coco coir seed sprouters
The Nibble and Graze indoor gardens come with organic and heirloom seeds specifically slected for growing indoors in our system
]]>
https://greenthumbtech.com/blogs/news/growing-cooking-and-preserving-basil2022-06-11T21:22:59-07:002022-06-11T21:27:56-07:00Growing, Cooking and Preserving BasilJen McGuinness
Growing basil is super easy, provides a continuous harvest and a lush look to your wall. Indoors, it can grow as a perennial. While many varieties of basil can be grown in a VerdeGarden, three of our favorites are:
Rosie Organic - a vigorous plant with beautiful dark purple leaves and lavendar flowers. Not only is it beautiful to look at, it tastes great too! Certified organic seeds.
Thai Basil - a heirloom variety with a spicy flavour for authentic Thai cuisine. A must for cooking, and its bright green leaves and thick foliage fill out your wall beautifully.
Sweet Genovese Basil - the best for pesto! Big bright green leaves will supply you with a continuous supply all year round
Sowing Seeds
In your VerdeGarden you can plant 3 basil seeds per coco puck, a ½” deep. You can leave all seeds that sprout grow in a single pot for more production.
Nutrients and Watering
When you add new seeds to your VerdeGarden stop feeding with nutrients and just cycle fresh water on the pumps regular watering schedule. Seeds have stored energy so they do not require nutrients. If you have a mix of new seeds and mature plants, it is OK for your mature plants to go without nutrients for a few weeks. It will slow down their growth, but will not jeopardize them in any way. Running a fresh water cycle once every 8 weeks also help flush out any unused nutrients and minerals, keeping the inside of your garden clean.
Start your nutrient feeding cycle when there are at least 4 leave on your new seedling. Follow the nutrient feeding chart. Using more nutrients than recommended will not make them grow faster and will burn your plants. If you have plants in a variety of life stages use the nutrientrecommendations for your youngest plants in your VerdeGarden.
Pictured below are basil seedlings in one coco puck. The smallest one circled in red, is an example of a seedling that is not ready for nutrients, the leaves marked in red are called cotyledons. The largest seedling has 4 true leaves, marked in blue, and is ready for nutrients as per the chart recommendations. One with a plant that just needs water. The larger plants are ready for nutrients. In this case you can just pluck out the small seedling and go with the two larger plants.
Water but do not add nutrients until there are at least 4 leaves per plant. Follow nutrient feeding chart and do not over feed.
Sow 2-3 seeds per
Pruning
Once stock is 6” tall pinch off the tops to encourage bushy growth. Pinch off purple flower buds to encourage more harvest. Pick young shoots regularly, frequent picking will promote further growth.
Preserving
To preserve the flavour when cooking with fresh basil, tear the leaves instead of chopping. Basil can be stored by either dehydrating the leaves or chopping into small pieces and freezing with water in ice cube trays - an easy way to add basil to your cooked meals.
]]>
https://greenthumbtech.com/blogs/news/cooking-with-the-asian-greens-seed-kit2020-11-18T12:06:48-08:002022-06-11T21:10:04-07:00STIR-FRIED ASIAN GREENS AND MIZUNA WITH TOFUJen McGuinness
Want to try out some new flavours and a dish that is packed with nutrients? Give this dish a try using our Asian Greens Seed Kit.
click on image for seed kit
YIELD: Makes 4 servings
TOTAL TIME: 30 minutes
INGREDIENTS
3 1/2 tablespoons soy sauce, divided
4 teaspoons Asian sesame oil, divided
3 1/2 teaspoons unseasoned rice vinegar, divided
1 14- to 16-ounce container extra-firm tofu, drained
2 tablespoons peanut oil
4 green onions, chopped
1 tablespoon finely chopped peeled fresh ginger
2 garlic cloves, finely chopped
12 baby leaves of Spring Jade Choi Sum and/or Tokyo Bekana, leaves separated
12 cups loosely packed mizuna (about 8 ounces)
PREPARATION
Whisk 2 tablespoons soy sauce, 2 teaspoons sesame oil, and 1/2 teaspoon vinegar in bowl.
Stack 2 paper towels on work surface. Cut tofu crosswise into 3/4-inch-thick slices; cut each slice crosswise in half. Arrange tofu on paper towels and let stand 10 minutes. Pat top of tofu dry.
Heat peanut oil in large nonstick skillet over medium-high heat. Add tofu and cook, without moving, until golden brown on bottom, 2 to 3 minutes per side. Transfer tofu to paper towel to drain, then place tofu on sheet of foil and brush both sides with soy sauce mixture.
Wipe out any peanut oil from skillet. Add 2 teaspoons sesame oil and place skillet over medium heat. Add green onions, ginger, and garlic. Stir until fragrant, about 30 seconds. Add remaining 1 1/2 tablespoons soy sauce and 3 teaspoons vinegar, then Spring Jade Choi Sum and Tokyo Bekana, Toss until choi greens wilts, 1 to 2 minutes. Add mizuna in 2 batches, tossing to wilt before adding more, 1 to 2 minutes per batch. Season greens with salt and pepper. Add tofu to skillet. Toss gently to blend. Transfer to platter.
]]>
https://greenthumbtech.com/blogs/news/26976833-basil-kale-hummus-this-is-so-good2020-11-18T12:04:35-08:002022-06-11T21:10:32-07:00Basil-Kale Hummus - This Is SO GOOD!Jen McGuinness
Really Tasty, better than store bought & easy to make! Pick fresh Basil & Kale from your Veggie-Wall
Recipe: 1 Can or cup re-hydrated of chick peas 3 cloves of garlic 12 Organic Basil Leaves from Green Thumb Tech Veggie-Wall 3 Organic Kale Leaves from Green Thumb Tech Veggie-Wall 1/4 cup of extra virgin olive oil
Mix in food processor. Add more oil for desired smoothness. Spread on crackers, sandwiches, or eat with other Green Thumb Tech Veggies
]]>
https://greenthumbtech.com/blogs/news/what-is-succession-planting-and-how-do-i-do-it2020-10-18T17:51:18-07:002022-06-11T21:24:56-07:00What is Succession Planting and How do I Do It?Jen McGuinness
What is Succession Planting?
Succession planting is simply staggering crops so you are not harvesting all at the same time, but instead have a continuous yield. This can help with going from having too many tomatoes to none at all, and having to wait a month or more for the next plant to yield its fruits.
Don't want that much cilantro all at once? Try succession planting.
How to succession plant in a VerdeGarden?
1. Look at your seed package for a maturity date
The maturity date is the approximate number of days it takes for a plant to grow from seed to harvest, this can vary due to climate, quality of seed and proper nutrients, but it's a good starting point. For example, you may have some varieties of lettuce with a maturity date of 45 days, and others as long as 65 days. With hydroponic growing, the maturity date is shortened due to the plant not needing to establish complex roots that can source out nutrients in soil.
If you are using Green Thumb Technology's organic and heirloom seeds, simply follow the maturity date provided on the seed packaging. If you are using your own seeds, subtract 2 weeks from the maturity date provided.
2. Plant your first crop
Plant your first crop by placing seeds in the coco coir seeds sprouters, and then place in the pot with recycled glass. Place the pot in your VerdeGarden and mark the date on your calendar to refer back to later. For example, plant your first cilantro seeds, and save some for later.
3. Plant your succession crop
Wait 2-3 weeks before planting your next crop. Now plant your next crop of cilantro and mark again on the calendar. You can continue this process for as many crops as you would like, 2, 3, 4, 5...
4. Harvest your first crop
Start harvesting your first crop once it is ready, and again mark the date you started harvesting. Many herbs and greens will continue to produce a yield if you only harvest 1/3 of the plant at a time.
5. Harvest your second crop
As above, and perhaps now you have fully harvested your first crop and are planting more seeds.
6. Check your calendar and make adjustments if needed
Now you can check you calendar and see if you need to make any adjustments to your succession crop. Did you have a gap in between your first and second crop? Then reduce the time in between planting your first and second seeds. Not enough of a gap between crops? Increase the time between planting.
Useful Tips
Tiip1
There are some things you should keep in mind when succession planting. Different varieties of tomatoes, for example, will grow at different rates, so be sure to check each varieties specific maturity date.
Tip 2
Some seeds will just out preform others, so may grow faster or bigger than your other plant of the same variety. That's ok, it's just good to know. Gardening is a blend of an art and a science, it does not always produce the exact same outcome, but that is part of the fun!
Tip 3
Your succession planting and maturity dates may vary with the seasons. Is your home hotter in the summer than the winter? Expect plants to mature quicker in a warm house vs. a cold house... unless they are cold-loving plants of course. Humidity levels in your house will also affect the maturity date.
Share your experiences
We would love to hear from you and what worked well for you. Please feel to reach out and share your story with us. Or get in touch if you have further questions Contact Us
]]>
https://greenthumbtech.com/blogs/news/how-do-we-stack-up-against-the-competition2020-05-12T13:50:00-07:002022-06-11T21:40:28-07:00How do we stack up against the competition?Jen McGuinness
When we began researching and sketching ideas there were four indoor gardens on the mainstream market, and new concepts coming out regularly. Throughout the process of creating verdeGardens, Matt and I watched many more indoor gardens get developed. Each time I took a sigh of relief that each new product was another counter-top garden or a large cabinet-sized garden, using pre-existing hydroponic systems. Clearly there is a demand for indoor gardens, but who has the counter or floor space? If you are like me, you despise countertop clutter. Customers were also not getting a lot of plants for the high cost of these other indoor gardens.
It was important to us to have a indoor garden that adds to the ambiance of your home, does not take up valuable space, and actually grows enough food so you can recoup your costs, so we invented a new, patented, hydroponic system.
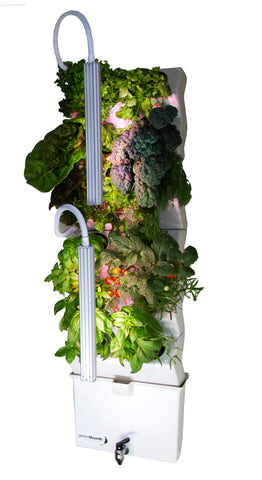
The verdeGraze
We invented the Vertical Nutrient Cascade Technology
Vertical. 24 plants in 2.5 square feet.
Easy to use and gives you success with growing food even if you do not have the know-how. Our technology is your green thumb.
Fits seamlessly in your living space. Stylish, slim, and artistic.
Modular
Automated LED lights for growing plants year-round.
Automated self-watering pump
Wifi micro-controller connects to your smart device for growing tips.
]]>
https://greenthumbtech.com/blogs/news/growing-food-for-better-health-environment-society2020-05-12T13:49:00-07:002022-06-11T21:26:59-07:00Growing Food: For Better Health, Environment & SocietyJen McGuinness
Grow my own food? Why bother?
Personally for me, I have many reasons. I can break them into 3 categories: my health, it's better for the environment, and social contribution.
Personal Health:
Jen: Contemplation in the Bugaboo Mountains
I have experienced 2 close family members pass away from cancer. My Dad battled cancer for 7 years, in that time he changed his diet and experienced a quality 6 years before succumbing to the disease. I know a lot of you can relate. Eating healthy reduces our risk of diseases. Yes, of course, we are all going to go sometime... BUT, I am not just eating well to prevent disease, it goes well beyond that for me! It's more about the present. I truly believe in, and feel blessed about, being active, being in nature, and living a full life! Nourishing my body with good food allows me to have the mental, emotional and physical outlook to experience the best of life.
The BEST food, is food you GROW YOURSELF. Why? Plants like, leafy greens, loose their nutrients once they have been picked. For example, leafy greens can loose 50-90% of their vitamin C in 24-48 hours. The longer plants have to be shipped (I'm thinking boxed lettuce from California to BC), sit in the grocery store and in your fridge, the less nutritious value you get from them. We think we are doing something good, by eating a salad, but we are only getting a fraction of its benefits.
Picking fresh greens from the VeggieWall
Growing fresh means I can pick it and use it the same day, maintaining 100% of the foods essential vitamins and minerals! And WOW! Does it ever taste better!
Of course there are other health reasons that are important to me, namely when I grow my own food, I know what's in it. This is often the same reason I buy from local farmers. The organic industry does allow for certain pesticides to be used on "organic" vegetables. Did you know there are pesticides that are banned in Europe that are used in the US?
Lastly, growing your own food opens a whole new world of varieties of produce you can't find anywhere in the grocery stores. The heirloom and organic varieties that are available when you grow from seed are outstanding in flavour, look, and nutritious benefits.
Next blog, I will talk about the benefits to the environment in growing your own food. Until then, eat something fresh & get outside! Thank you for reading.
-Jen
Jen, her dog Neve, and friends riding in an Alpine Meadow
]]>
https://greenthumbtech.com/blogs/news/in-the-news-maximim-yield2017-02-22T14:43:00-08:002020-05-12T13:47:11-07:00In the News... Maximim YieldJen McGuinness
Thank you for the article Maximum Yield!